How to Get Ink Out of a Dryer
Your dryer is an essential appliance in your home, especially if it comes to maintaining the cleanliness and dryness of your clothes. But what do you do when your trusty dryer is not spinning? Don’t worry, this common problem can be fixed with some troubleshooting and DIY solutions. In this guide, we’ll walk you through the steps to identify the problem and turn your dryer.
Safety First
Your safety should always be the first concern when dealing with any household appliance repair. Before you even think about troubleshooting your nonspinning dryer, follow these essential safety precautions:
- Unplug the Dryer: Start by disconnecting the dryer from the electricity source. This step is essential to prevent electrical shocks during inspection and repair.
- Gas Dryers: If you have a gas dryer, also turn off the gas supply to the appliance. Gas leaks can be extremely dangerous, so ensure that the gas valve is closed.
- Ventilation: Ensure the laundry area is well-ventilated, as you’ll be using cleaning agents. Open windows or doors if necessary.
- Protective Gear: Consider wearing gloves and eye protection to shield yourself during the cleaning process.
Common Reasons for a Dryer Not Spinning
Understanding the root cause of the spinning problem of your dryer is crucial to properly diagnose and correct the problem. The following are some of the most common reasons why your dryer stops rotating:
- Power Supply Problems: Check if the dryer is receiving power. A blown fuse or tripped circuit breaker could be the issue.
- Faulty Start Switch: The start switch initiates the spinning process. If it’s malfunctioning, the dryer won’t start spinning.
- Broken Drive Belt: The drive belt connects the motor to the drum. If it’s damaged or broken, the drum won’t spin.
- Motor Issues: The motor is the heart of your dryer’s spinning mechanism. Motor problems can range from overheating to complete failure.
- Worn Drum Rollers: Drum rollers support the drum’s movement. If they’re worn out, the drum may not spin smoothly.
- The thermal fuse: The thermal fuse is a safety feature that stops the dryer’s power supply if it overheats. If it is blown, the dryer will not rotate.
- Lint Buildup: The presence of an excessive amount of lint in either the lint filter or the vent has the potential to impede the flow of air, thus resulting in the overheating of the dryer and subsequently leading to the cessation of its spinning motion.
Tools and Supplies
To effectively troubleshoot and fix your dryer, you’ll need the following tools and materials:
- Screwdrivers: Both flathead and Phillips screwdrivers will come in handy for opening panels and accessing components.
- Multimeter: This tool helps you check for electrical continuity and diagnose electrical problems.
- Replacement Parts: Depending on the particular problem that is identified, it may be necessary to acquire replacement components such as a fresh driving belt, a new motor, or a thermal fuse.
- Socket and Wrench Set: Useful for removing and replacing components, especially if you need to access the motor or drum rollers.
- Lint Brush or Vacuum Attachment: The utilization of a lint brush or a vacuum attachment is an indispensable aspect when it comes to the removal of lint from both the lint filter and the dryer vent.
- Safety Gear: As mentioned earlier, consider safety goggles and gloves to protect yourself during the repair process.
With the aid of these instruments and substances at your disposal, you will possess ample readiness to confront the procedure of resolving issues and, if required, undertaking the mending of your malfunctioning clothes dryer.
Step-by-Step Troubleshooting Guide
Having equipped yourself with the essential instruments and safety measures, it is time to delve into the comprehensive and sequential troubleshooting manual designed for rectifying the malfunctioning of your non-rotating clothing drying apparatus. We shall meticulously guide you through every phase of the procedure, guaranteeing your ability to successfully recognize and resolve the issue at hand.
Checking Power Supply
The initial step entails confirming that the dryer is being supplied with electricity and that there are no electrical complications giving rise to the issue. The following course of action should be taken:
- Plug Inspection: Start by checking if the dryer is properly plugged into the electrical outlet. Sometimes, it might come loose over time.
- Circuit Breaker or Fuse Box: Examine your home’s circuit breaker or fuse box. Look for a tripped breaker or a blown fuse related to the dryer circuit. If you find any, reset the breaker or replace the fuse.
- Voltage Test: One can employ a multimeter in order to confirm that the electrical outlet is dispensing the accurate voltage. It is common for dryers to necessitate 240 volts for the purpose of achieving suitable functionality.
Examining the Start Switch
A defective initial switch can serve as a direct factor for the lack of rotation in your drying machine. The following instructions provide guidance on how to examine and, if necessary, substitute this component.
- Access the Start Switch: Depending upon the specific model of your dryer, it may be necessary for you to eliminate either the control panel or the rear panel so as to gain access to the initiation switch.
- Testing the Start Switch: Please utilize a multimeter to verify the continuity of the circuit upon activating the start button. In the event that there is an absence of continuity, it is highly probable that the switch is defective and necessitates replacement.
- Replacement: If you determine that the start switch is defective, replace it with a compatible one following the manufacturer’s instructions.
Inspecting the Drive Belt
The drive belt serves as a connection between the motor and the drum, facilitating the process of rotation. In the event that it becomes damaged or broken, the spinning mechanism of your dryer will no longer function. Presented below are the steps to verify and subsequently replace the defective component.
- Access the Belt: Typically, you’ll need to open the dryer’s cabinet or front panel to access the belt.
- Inspect the Belt: Inspect the drive belt for any indications of wear, fraying, or impairment. In the event that it is found to be in a substandard state, it is imperative that a replacement is sought.
- Replacement: To replace the belt, release the tension on the idler pulley or motor, remove the old belt, and install the new one according to your dryer’s specifications.
Assessing the Motor
A malfunctioning motor can be a major issue. Here’s how to test and replace the motor if necessary:
- Access the Motor: Depending on the configuration of your dryer, it may be necessary to detach either the front or rear panel in order to gain access to the motor.
- Testing the Motor: Use a multimeter to test the motor for continuity. If it doesn’t show continuity, the motor may be defective and should be replaced.
- Replacement: replacing the motor may entail a higher level of complexity and may necessitate the disconnection of multiple components. Should you find yourself uncertain, it is advised to adhere to the instructions provided in your dryer’s service manual or alternatively, seek guidance from a qualified professional.
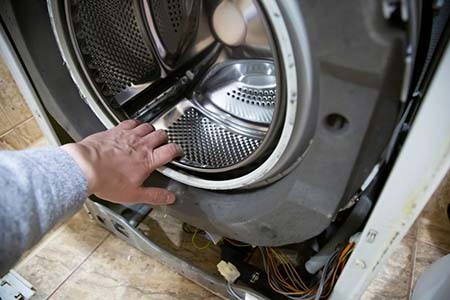
Examining the Drum Rollers
Worn-out drum rollers can cause noisy and inefficient spinning. Here’s how to inspect and replace them:
- Access the Rollers: You’ll typically need to remove the dryer’s front or rear panel to access the drum rollers.
- Inspect the Rollers: Check for signs of wear or damage on the rollers. If they don’t turn smoothly, they should be replaced.
- Replacement: Substitute any deteriorated or impaired rollers with appropriate replacements in accordance with the guidelines provided by the manufacturer.
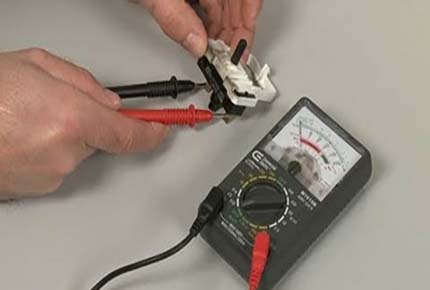
Testing the Thermal Fuse
The thermal fuse is an essential safety component that can result in the cessation of the spinning motion of your dryer in the event of its failure. Herein lies a guide on examining and substituting said fuse:
- Locate the Thermal Fuse: Identify the position of the Thermal Fuse: Generally, the thermal fuse can be located either on the blower housing or the exhaust duct.
- Testing the Fuse: To assess the integrity of the thermal fuse, employ a multimeter to verify its continuity. In the event that continuity is not detected, it is imperative to proceed with the replacement of the fuse.
- Replacement: Replace the blown thermal fuse with a new one, ensuring it matches your dryer’s specifications.
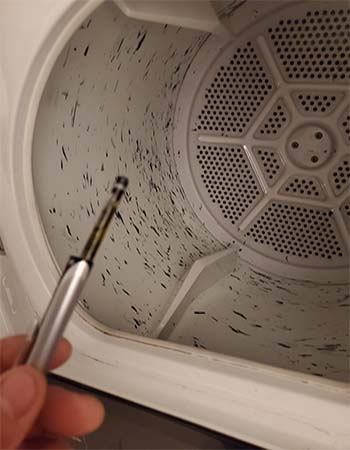
Cleaning the Lint Filter and Vent
A clogged lint filter or vent can restrict airflow and affect your dryer’s performance. Here’s how to clean them effectively:
- Lint Filter: Remove the lint filter and clean it thoroughly with a brush or warm, soapy water. Allow it to dry before reinserting it.
- Vent Cleaning: Disconnect the dryer from the vent and use a lint brush or vacuum attachment to remove lint buildup from both the dryer vent and the external vent exhaust. Ensure that the airflow is unobstructed.
By following these troubleshooting steps, you’ll have a clearer understanding of what’s causing your dryer’s spinning issue and be better equipped to resolve it. If the problem persists or you’re uncomfortable with the repair process, don’t hesitate to seek professional assistance.
Maintenance Tips to Prevent Future Issues
Preventive maintenance assumes a pivotal role in extending the lifespan of your dryer and guaranteeing its uninterrupted operation. Below, we present practical suggestions aimed at assisting you in upholding your dryer’s optimal state and circumventing prospective spinning complications.
- Regularly Clean the Lint Filter: After every drying cycle, remove and clean the lint filter. A clogged filter restricts airflow, leading to overheating and potential issues. Cleaning it takes only a few seconds and significantly reduces the risk of lint-related problems.
- Inspect and Clean the Ventilation System: Periodically check the dryer vent and exhaust duct for lint buildup. Disconnect the vent and use a lint brush or vacuum attachment to remove any accumulated lint. A clear ventilation system ensures efficient drying and reduces fire hazards.
- Balance the Load: Overloading your dryer can strain the motor and other components, leading to premature wear and tear. Follow the manufacturer’s guidelines for load capacity and avoid overloading your dryer to prevent spinning issues.
- Use Fabric Softener Sparingly: Excessive use of fabric softener can lead to a buildup of residue on the lint filter and inside the dryer. This can reduce airflow and affect spinning efficiency. Use fabric softener as recommended and clean the lint filter regularly to prevent this buildup.
- Inspect and Tighten Screws and Bolts: Vibrations during operation can cause screws and bolts to loosen over time. Periodically check the dryer’s exterior and interior for loose fasteners and tighten them as needed.
- Keep the Dryer Level: A dryer that is not level can lead to uneven wear on its components, including the drive belt. Use a leveling tool to ensure your dryer is on a stable and even surface.
- Avoid Overheating: Overheating can cause thermal fuses to blow and result in your dryer not spinning. To prevent this, avoid running your dryer at excessively high temperatures. If your dryer has adjustable heat settings, use them appropriately for different types of loads.
- Schedule Professional Maintenance: Consider scheduling annual or bi-annual professional maintenance for your dryer. A technician can inspect and clean internal components, ensuring optimal performance and catching potential issues before they become major problems.